Showing posts with label Memphis. Show all posts

Thursday, September 12, 2013

Rebel Raiders Replay Part III: 1864 Loose the Fateful Lightning

Rebel Raiders Replay:  1862 Jump Start Part III:  1864 Loose the Fateful Lightning

The Developer & A Naval Historian Team Up Against the Designer in the 1862 Scenario

Parts I and II of the replay describe the initially successful Confederate defense, followed by the sweeping of the seas of all things Gray and “The Nightmare Year” of 1863 in which the South was gutted.  Undaunted, the Rebels counterattacked, thus making Union victory far from certain…

With more ships than it had jobs for them to do, throughout 1864 the Union spent most of its builds on buying extra attacks, thus enabling it to make four assaults a turn. Play of Loose the Fateful Lightning (USN Card 34) added yet an additional attack for EACH remaining turn.  The Union used these well, driving still deeper into the South, and then responding to desperate if successful Rebel counterattacks by regaining for the Union what the South had but briefly taken back.

The game was still hanging in the balance in December 1864, normally the final turn of the game.  With five attacks the Union had to conquer three key cities.  Mark played the General Pierre Toussaint Beauregard (CSN Card 88) card to build a battery in newly recaptured Richmond and also deployed the cream of Confederate leadership: Lee, Jackson and even Longstreet! (CSN Card 79), giving the South a total of six dice to defend the ruins of the capital.   He also got Memphis back.  Now, to win, the Union would have to once again take Richmond and the diminished Memphis as well as the very heavily fortified city of New Orleans.  

Fred and Brandon had drawn If It Takes All Summer (USN Card 36), which gives the Union a chance for a possible 13th Turn.  That led a debate as to whether to go for the game-winning hat trick or attempt to storm Savannah and Charleston from newly captured Augusta.  They were held by three and two Batteries each, respectively, but possession of those ports would greatly improve the Union’s chances to add an extra game turn through play of that card.

Wary of pinning everything on a single die roll to get that extra turn, however, Fred and Brandon decided to go all-out for the three key Confederate cities in a final offensive surge.  One of those attacks was stymied by the Rebel play of Mud-Bound (CSN Card 59).  Undaunted, with Sherman, Grant and other cards in hand, on to Richmond, Memphis and New Orleans they came….


 Damn Yankees – they won all three fights, winning the game with but one attack still left in hand…


Wednesday, September 11, 2013

Rebel Raiders Replay: 1862 Jump Start Part II: 1863 The Nightmare Year


The Developer & A Naval Historian Team Up Against the Designer in the 1862 Scenario

As noted in Part I, the South built up a strong crust defense and repulsed almost all of the Union’s attacks in 1862, yet despite an initial “happy time” was all but swept from the seas.  On to 1863:  The Nightmare Year

1863 was a nightmare for the South on land.  The Union broke through the crust defense, playing Three Cigars (USN Card 45) which stopped Stonewall Jackson and any Confederate cards from being played and enabled the Northern capture of Richmond. On the following turn the Union cracked the line at Chattanooga – despite a stout defense of three Batteries and J.E. Johnston – and used Grant and Sherman  (USN Cards 8 and 50) and other cards to dash down to Atlanta.  Suddenly there were no arsenals to build Batteries and very few Blockade Runners to bring in cargo. There were also fewer Raiders to destroy Union commerce for Victory Points – and even if more had survived, each turn’s Supply Roll penalties for losing Atlanta and Richmond, as well as the regular one die roll (three dice in all each turn!) would have rendered their point contributions moot.

Thus, the rest of 1863 and into 1864 were very difficult for the Confederacy but Mark did not despair; he mounted inspired counterattacks to keep the South viable. The Union had built a cordon around Richmond by seizing Fredericksburg, Norfolk and Goldsboro but Lee and Jackson nonetheless staged a whirlwind campaign, first recapturing Goldsboro with a regular counter-attack and then Richmond itself with The South Shall Rise (CSN Card 107) to regain the capital of the Confederacy. After Island No. 10’s capture, successive waves of Yankee Ironclads and gunboats conquered Memphis, which the South successfully retook with a Counterattack.


The Union responded to this last Rebel Western Theatre offensive success by marching west out of Union-held Atlanta to seize Montgomery and Vicksburg via its land approach and then on to capture the Fort of Baton Rouge.   This was complemented, after several failures, by Farragut at long last capturing the fort guarding New Orleans from the Gulf. As the nightmare of 1863 came to an end, the South pinned its hopes on a pair of Virginia gentlemen hunkering down in a smoldering Richmond, and on New Orleans, which with its defense of three Batteries, a Gunboat, and an Ironclad though isolated remained defiant and unbowed. 

Tomorrow: 1864 the year the Union players Loose the Fateful Lightning....


Monday, August 19, 2013

How Patrick Kairns Won and Bob Kasabian ALMOST Won as the Union

Two Games, Two Condensed Replays of Rebel Raiders…and a compliment from Hong Kong.

Rebel Raiders is a really great game” says Alfred Wong of Hong Kong.  “My friend and I enjoy every game we play.”

Bob Kasabian’s “Almost” Union Victory (“Both of us love this game”)
-This from Bob Kasbian:

Just finished our second game of Rebel Raiders. This time I had a much more coordinated Union strategy, and with the aid of the card that extends the game one turn, came within a whisker of winning. On the final turn, I took Atlanta and Richmond, despite there being three batteries in each, but Farragut, with an eight sloop Grand Fleet, could not defeat the Rebs in New Orleans. The CSA VP total was negative, but since I had only 12 CSA cities/ports, I needed all three of the above (already had Memphis and Vicksburg) to get the win. We used no optional rules. The one change in Union strategy I would make would be a wolfpack of Screw Sloops to hunt down Raiders. They roamed free much of the game, and earned lots of VPs. Both of us love this game.

Patrick Kairn’s “Emotional Rollercoaster” – or when the Union is down, the only way is back up…to victory

-This from Patrick Kairns in Montreal

An emotional roller-coaster
My nephew and I played Rebel Raiders last night for the first time face-to-face. We had played a couple of times using the Vassal module. We started with the 1862 scenario with no optional rules, although the play book advised using some optionals. We wanted to see how differently the 1862 scenario would play from the Basic Game (1861). Did we EVER find out!! I was the Union and he was the CSA.

The game was an amazing roller-coaster ride! All the way through 1862 and half way through 1863 the
Union could do NOTHING right and the CSA could do NOTHING wrong! My dice rolling was atrocious through that period or if I did get a good roll my nephew would get an exact same roll, therefore winning the assaults, speed rolls, etc. If I remember correctly I must have unsuccessfully assaulted New Orleans (the only city I needed to capture the Mississippi) about 5 times!! I had an amazingly difficult time (dice again) capturing coastal cities as well. So I turned my attention to destroying his Blockade Runners, and Raiders and was quite successful (at last). I had to. He topped-out many times at 50 VPs. He was on top of the world and I was about to burn the game...literally!

Then finally in mid-1863 the cards
AND dice finally turned. His inability to accumulate VPs by sea and my capturing of Atlanta started to bite into his VP total during the CSA supply phase (rolling two dice & subtracting that result from his VPs.) When I did capture New Orleans and he was to roll 3 negative dice in his supply phase, and I had him discard R.E. Lee from his hand hurting his chances of defending Richmond, he surrendered in April 1864. Now the roles reversed completely. I was elated and he was crushed.....emotionally.

The game play was very exciting, at times very frustrating, but immensely entertaining. As the
Union I learned to be patient, forget my bad dice rolling and concentrate on my plan, which was more or less trying to implement "The Anaconda Plan". To my relief it worked.

This was not a complete game, but very close to being one. As stated we played until April 1864 when we both agreed a Union victory was inevitable. I had whittled his VPs down to low 20's, and would have smashed through to
Richmond in the 3-4 turns we had remaining. I was building 2 extra Cannon Pawns/turn availing me of 4 assaults/turn plus his Supply rolls would have done the CSA in.

It was a tremendous game. An exciting time was had by all. If I may add a bit of advice, do not get too high or discouraged with your play. the tables can turn extremely quickly.

Have fun, and if you don't own Rebel Raiders on the High Seas, it is worth the price of admission and belongs in your game collection.

…and then he added:


Thanks to both you and Fred for creating such a great game!

Friday, July 26, 2013

The Ships of Rebel Raiders - The Ironclads

Rebel Raiders on the High Seas is a strategic game of the Civil War which focuses on the role of the navies on the rivers, along the coasts and on the oceans.  While most ships are represented by generic counters for Ironclads, Blockade Runners, Gunboats, Screw Sloops and, of course Raiders, there are cards and corresponding counters for many individual vessels.  This series presents those cards and offers a glimpse into the history of these storied ships.

Part IV– The Union Ironclads : USS Carondelet  “Pook’s Turtle” vs. Hood
  
USS Carondelet (USN Card 15) was a City-Class ironclad built in the Missouri city for which it was named.  One of the shallow-draft “Pook’s Turtles” designed by Samuel Pook, she was commissioned at Cairo in January 1862 and was one of the first and most powerful ships in the Western Gunboat Flotilla of Flag Officer Andrew Foote (who is one of the Union leaders in Rebel Raiders).

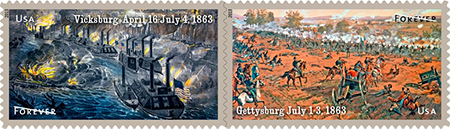
The ironclad fought at Forts Henry and Donelson , Island No. 10, and Memphis, and was badly damaged in a close action duel with the Confederate ironclad CSS Arkansas on the Yazoo River.  She was repaired in time to run the guns at Vicksburg in April 1863 (see U.S. Postage stamp shown below), and was also part of the Red River Fiasco (represented in the game by CSN Card 76).


USS Carondelet survived that disaster, and went back up the Cumberland in December 1864 to duel with Rebel artillery during the Nashville campaign – and later pouring heavy fire into the flank of John Bell Hood’s army when General Thomas counterattacked.  (Hood and his last, desperate effort to turn the tide are represented by CSN Card 89, which bear’s the luckless general’s name).


Friday, July 19, 2013

The Ships of Rebel Raiders - The Gunboats

Rebel Raiders on the High Seas is a strategic game of the Civil War which focuses on the role of the navies on the rivers, along the coasts and on the oceans.  While most ships are represented by generic counters for Ironclads, Blockade Runners, Gunboats, Screw Sloops and, of course Raiders, there are cards and corresponding counters for many individual vessels.  This series presents those cards and offers a glimpse into the history of these storied ships.

Part II – The Gunboats:  A Victory for The Mosquito Fleet Rams

Not all of the Confederacy’s gunboats were more boat than gun, to paraphrase one of their commanders.  The Rebel River Defense Fleet under Captain James Montgomery (who appears in Rebel Raiders as one of the two Confederate naval leaders counters) had one very good day – that day was May 10, 1862, in what became known as “The Battle of Plum Point Bend.”

In preparation for the attack on Fort Pillow, the Union ironclad USS Cincinnati was escorting a mortar boat (of the type portrayed in Rebel Raiders by USN Card 2 – David Dixon Porter & His Little Mortar Boats) when they were suddenly surprised by all eight ships of  Montgomery’s flotilla.  Three rams steamed quickly to hit the USS Cincinnati in succession (CSS General Price, CSS General Bragg and CSS General Sumter).

 The Union ironclad USS Mound City tried to come to the aid of the sinking USS Cincinnati, but was in turn set upon by another ram,  CSS General Van Dorn, which despite being pounded by “broadside after broadside” from the Union warship, as an officer aboard recalled, the Rebel ram came on, struck and “tore away nearly half of our forecastle (and) opened an awful hole in our bows.” To save the ship and crew, the captain of the USS Mound City ran her aground on a sandbar.

 Montgomery, promoted to flag officer for his victory, upon his return to Memphis boasted that after Plum Point Bend the Union fleet would “never penetrate farther down the Mississippi.”

He was wrong.  The Union raised the USS Cincinnati and repaired both her and USS Mound City, brought in their own rams  (as depicted by USN Card 38 – USS Queen of the West or Ellet’s Ram) and drove down the river to take on Montgomery and his Mosquito Fleet (CSN Card 81) in full view of the citizens of Memphis.  Montgomery went out to meet them, bravely announcing as he left the dock that “you may see Lincoln’s gunboats sent to the bottom by the fleet which you have built and manned.”

That was June 6, less than a month after his victory at Plum Point Bend.  Within minutes of the engagement three of his eight ships were sunk; the other five, with Montgomery aboard, fled downriver, the Yankees in hot pursuit.  During the 10-mile running fight four of the Rebel ships were sunk; only the CSS General Van Dorn got away.


Tuesday, June 18, 2013

Vive l'Empereur - and "Happy" Waterloo Day ...at 7 p.m. tonight the Old Guard goes up the hill....

Meanwhile...

Rebel Raiders Replay Turn 10 (Part 2) April 1864 - DuPont, Conqueror of the Mississippi

Designer Mark McLaughlin as CSA; Naval Historian Brandon Musler as USA

When we left off, the mighty CSS Alabama, upon whom the Confederacy (and Mark) had pinned their last hopes for doing ANYTHING at sea, was caught and sunk on her maiden voyage by the largest warship in the U.S. Navy - USS Mississippi.  Now it is the Union turn, and Brandon is turning his sights to another Mississippi - the river and the Rebel fortresses that dominate it at Memphis and Vicksburg...


It is 1864, and the Union has four dice now in combat.  Brandon knows the clock is ticking, and comes on strong.

He comes back at Memphis again but this time plays DuPont (Card 54) to gain a big advantage (Rebel Batteries only fire one, not two, dice in the first round of combat).  With 5 Ironclads and a Gunboat he faces a Rebel force of 2 Ironclads, 1 Gunboat and 3 Batteries.  Two Batteries are destroyed in the first round, along with an Ironclad and the Gunboat, at no loss to the North.  Mark retreats his remaining Ironclad, sending it down river to Vicksburg.   Brandon completes the destruction of the defenses of Memphis, which falls easily and at great cost in VP to the South.


The Union keeps going with its second Assault of the turn.  The Union has so many ships on the river it almost does not have space for them…so down to Vicksburg they come.   The single Rebel Ironclad that survived Memphis and the one Battery there are no match for five Yankee Ironclads – actually, six, as Brandon plays the Tyler (USN Card 18) turning his sixth ship, a Gunboat, into a virtual Ironclad for the brief battle.

Vicksburg falls.   The South is once again in the negatives in VP.

Unvexed to the Sea?

With Memphis and Vicksburg gone, the North needs only New Orleans to complete its conquest of the Mississippi.  Six Screw Sloops come up river from Forts Jackson and St. Philip.  One is lost to the Battery before the Union warships smother it in shot and shell.  Incredibly, however, despite the advantage in dice and Union Tactics – New Orleans holds!


Brandon then turns to hunting Raiders, fails to find any, and spends his builds to buy four Assaults and an Screw Sloops.  He draws four cards, as it is 1864 (the Union gets that fourth draw in 1863 turns).Two Ironclads and a free Gunboat are placed in the Navy Yards.

Saturday, June 15, 2013

Rebel Raiders Replay  (Turn 9 –December 1863) Part 2: The Night They Drove Ole Dixie Down

Designer Mark McLaughlin as CSA; Naval Historian Brandon Musler as USA

When we last left off, the North had driven Southeast from Nashville, taking first Chattanooga, then Kennesaw Mountain, placing the Union adjacent to the beating heart of the Confederacy - Atlanta.  Brandon had also swept the seas of ALL Blockade Runners - catching all 8 during the Rebel turn.  Mark has built a few more, and has put in play the mighty Raider ALABAMA! (whose picture appears on the cover of Rebel Raiders on the High Seas).   Now, the Union strikes...Brandon is confident that...


This will be THE Night They Drove Ole Dixie DOWN!

Atlanta, the biggest naval battle of the game so far…and off a Raider-hunting we go!

Half-singing the title and key line from Joan Baez’s classic folk tune as noted above, Brandon gleefully pulls off many of the Screw Sloops from the outer ring of the blockade to go hunting Raiders – and puts no fewer than FOUR off Spain, where Alabama will begin her maiden voyage.

The South now has Five Raiders, including Alabama, and while Brandon fails to find any of the four at sea, each is now covered by at least one Screw Sloop and most also have a Screw Sloop in one or more sea zones around them – this makes raiding much more chancy of a profession….as every time a Raider moves into or raids, it triggers a speed roll by any Screw Sloops present.

Forts Jackson and St. Philip

Despite sending so many big warships out into the Atlantic, Brandon still has enough in the Gulf that he can muster SIX to attack Forts Jackson and St. Philip.   The South plays Mosquito Fleet (Card 81) and doubles the size of the Rebel flotilla there (to TWO gunboats), and with the Battery makes a desperate and heroic – if sadly, doomed – stand.   The Gunboats are sunk, the Battery is destroyed, but they take down two Union Screw Sloops with them.

Atlanta and Memphis

The blue-water Navy actions done with, Brandon turns the Army on to Atlanta.  The South rolls a modified 8 on the dice (a “6” plus three ones – and triples add 2 to the high die total).  The Union Tactics play also yields an 8 – and Brandon decides NOT to risk a re-roll with Grant (as it would be both pointless and would only give the South victory points from the difference in dice).  Since the Confederacy wins ties, the first Union assault on Atlanta is repulsed!

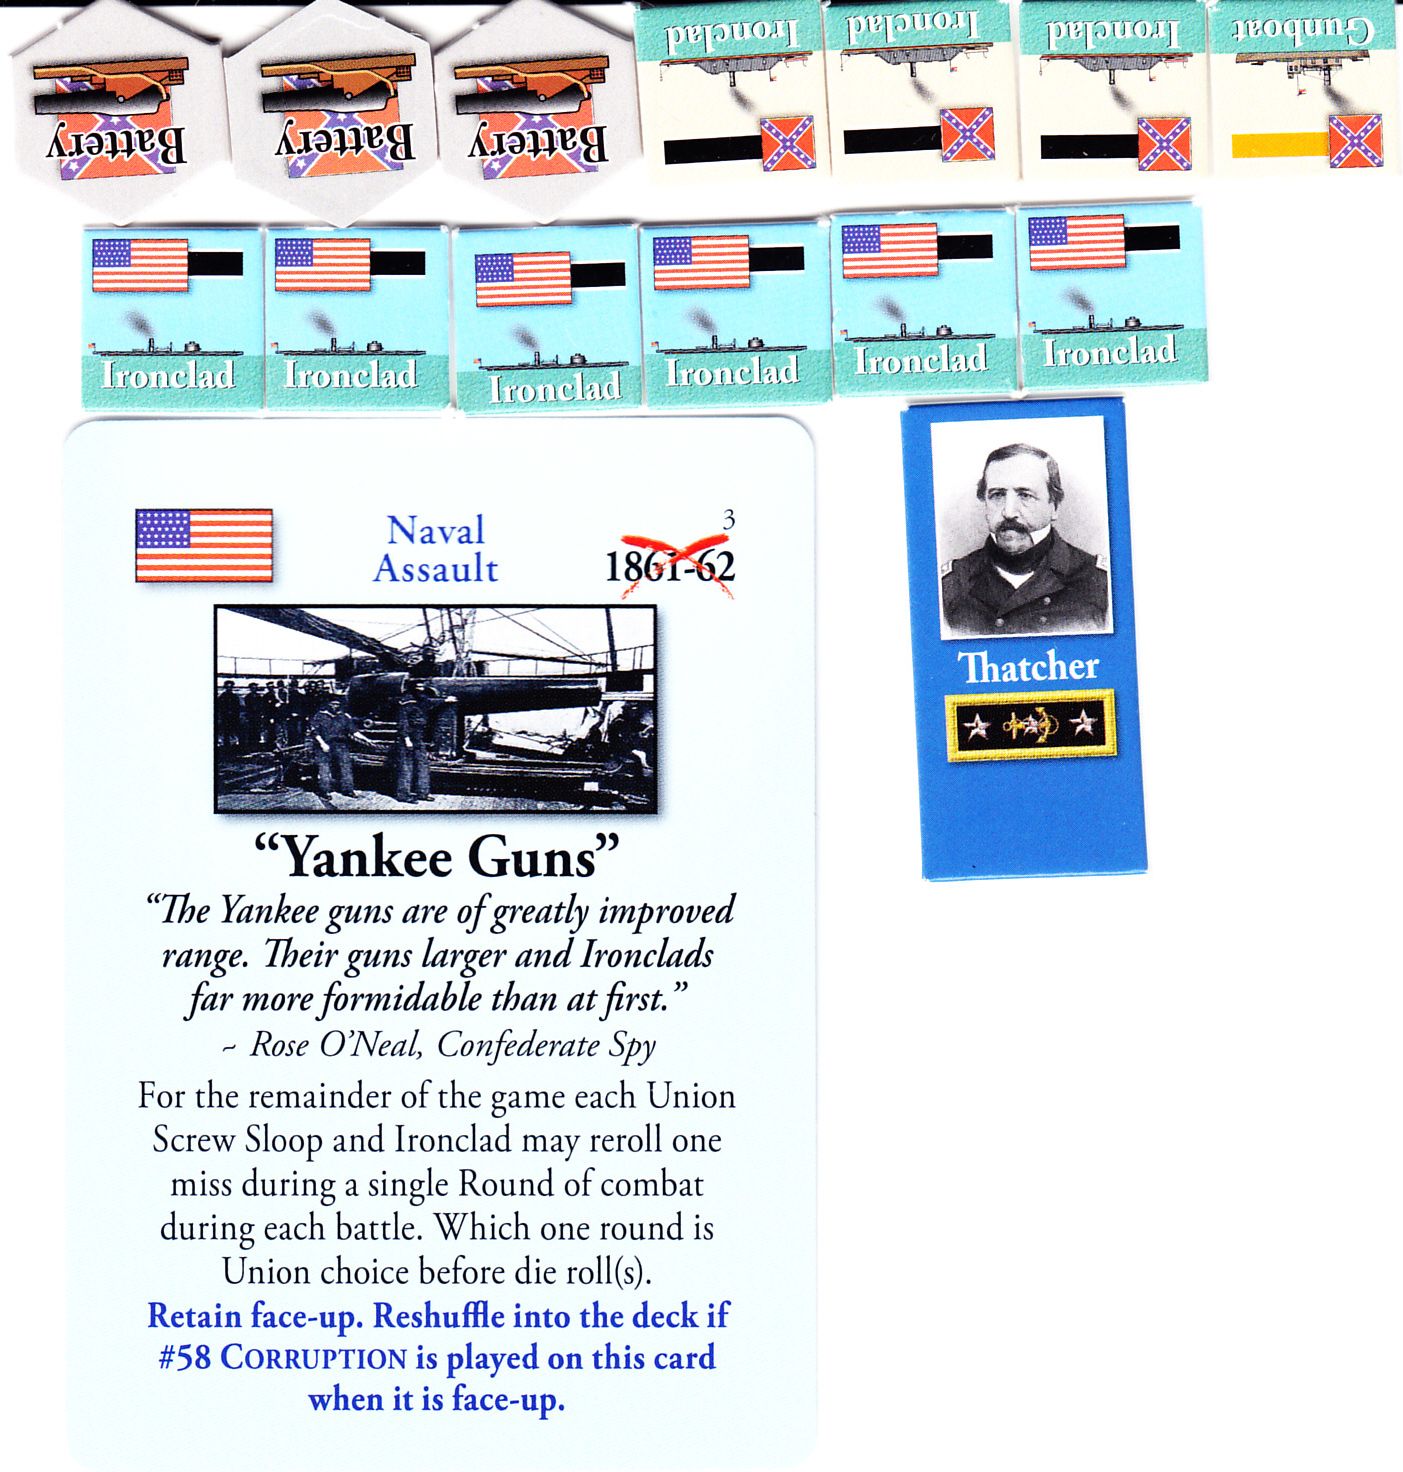
Mark is visibly relieved, and picks up the dice assuming Brandon will come at Atlanta again with another assault – but he doesn’t!  Switching focus, he has Thatcher gather up SIX Ironclads and sends them into Memphis!

The Biggest Naval Battle of the Game -  Memphis!

Six Union Ironclads oppose three Rebel Ironclads with a Gunboat and three Batteries.   Brandon admits this is a “battle of attrition,” and pins his hopes on Yankee Guns (Card 3) and its re-rolls for one round of naval combat as selected by the Union to clear the way, if not for an Assault, then for a second wave of ships to come down the river.

Mark has several options here.
-(1) Hide the Fleet behind the Batteries.
If he does this, the Rebel warships will not fire but neither will they be fired upon.   The North can NOT make an assault along the River if ANY Rebel ships are present.  This would bring about a nearly even fight (six Ironclads, with one die each, vs. three Batteries, with two dice each, both sides needing “6s” on dice to hit), although with Yankee Guns the North would get one re-roll per ship ..giving it effectively twice as many shots.    

While the Batteries might lose they would weaken the Union fleet, which would still have to take on the Rebel Navy if an Assault is to be carried through on the city.

-(2)  Hide the Batteries behind the Fleet.
If he does this, the three Rebel Ironclads and single gunboat are surely facing doom, being outgunned in dice by three to one (six Ironclads, one die each per ship, one die each per re-roll) but it could knock one or two Yankee ships out, and leave the Yankee ironclads to face the Batteries without their re-rolls (each ship can only use ONE re-roll per battle with Yankee Guns). 

Unfortunately, should the Rebel ships go down, the North can still launch its Assault – although Brandon would surely go in for at least one or two rounds to try to take out the Batteries and thus improve his odds of hitting the city.

-(3)  All on the Line.
This third option puts every Rebel piece into the line.  It maximizes Rebel firepower and gives the Yankees more targets than they can hit, although as they can still pick and choose.   It gives the North the option to go all in for batteries or put everything against ships.  This is Mark’s choice.

The Big Battle Commences:  man-o-war a man-o-war

Brandon decides to go man-o-war a man-o-war (and Battery).   He puts one Ironclad against each Battery and Ironclad.


In Round One, with Six initial dice and five re-rolls, Brandon manages to sink only 1 Rebel Ironclad.  The South, with Ten dice (two per each of the three Batteries, one per each of the four ships), returns the favor and sinks 1 Union Ironclad.

Round Two sees the Union miss entirely, and lose an Ironclad.  

Brandon retreats his four remaining Ironclads…thus ending this, his second Assault of the turn.  He still has two more Assault cannon, however, and this time he comes in by land.

With three Batteries still intact, that is three dice to add to the normal two for Confederate defenders.  The Union has only three dice (it is still 1863)….the result is a tie; the Union is repulsed.

 “Live by the dice, die by the dice” murmurs Brandon, who spends his builds to replace the two Ironclads and one of the Sloops he lost, and to buy a third Assault for next turn.


To be Continued….

Saturday, June 8, 2013

Rebel Raiders Replay  (Turn 7, Continued)

Designer Mark McLaughlin as CSA; Naval Historian Brandon Musler as USA

When we were last here, the North had just retreated from its abortive naval attack on Nashville…a battle in which three Rebel and two Union cards were played.  Brandon, however, pulled back the remnants of one fleet only to come on again with a fresh force…

Turn 7  (Part II)  The Second Battle of Nashville:  – Gunboats vs. Batteries

Brandon may have retreated from his first attack, but he is not done with Nashville.    He has a SECOND fleet on the river - with one Ironclad and five Gunboats….and in they come to fight the two remaining Rebel batteries.

The battle opens with a mighty cannonade of rolling dice and….
Every shot by every ship and battery in round one MISSES!

Round Two:  One Union Gunboat is sunk.  Yankees miss.
Round Three:  Three Gunboats go down.   No Batteries are hit.

The much-reduced Union fleet retires.

A lesser man (say, a Halleck or a McClellan) would call it a day – especially after losing two battles and two-thirds of the fleet in that second battle, but Brandon is made of sterner stuff.  Even if he can not weaken the city sufficiently by water, he will try by land….

Third Nashville  -  On Comes Grant and his Big Guns

The Union always gets two attacks a turn but Brandon, however, as is good practice for the Union from 1863 on has bought a third attack (the North can buy enough to make four attacks per turn).  He comes at Nashville by land, with Siege Train (Card 48) and Grant (Card 8).  He uses Union Tactics (which is a rule, not a card, giving up one of his dice to gain a +1 to the highest die he rolls).   Mark rolls higher…but Brandon throws down “Willing to Fight”  (Card 5) which allows the North to re-roll..and comes back in again – and Nashville FALLS!

It took five of the six cards in Brandon’s hand to take Nashville … but he got Siege Train back into his hand (a property of the card if victorious and with a decent die roll) and now Grant is out in the open, face up.

Having kicked open the door to the Confederate heartland (which is entirely undefended) presents the Union with many possibilities, and also allows for the declaration of the Emancipation Proclamation....the consequences of which, along with the mid-game strategic situation, will be discussed in the next posting....

To be continued….


Tuesday, June 4, 2013

Rebel Raiders Replay  (Turn  5)
Designer Mark McLaughlin as CSA; Naval Historian Brandon Musler as USA

When we left off last time, the Union had gained its first big victories, taking the port of St. Augustine and the fort space at Island No. 10…

Turn 5 – August 1862…Blockade Runner Captains Rethinking Career Choices…

Six Blockade Runners are caught in the Union net! Four of them loaded!  The Francis Bonneau card   comes out again, giving the South a much needed free Blockade Runner.  Even with Bonneau, only 8 VP of cargo make it through.  A desperate attempt to clear out the Blockade Station at Norfolk in a one-on-one gunboat sortie fails, and the Blockade Runner in the port has to take its chances getting out – and is promptly intercepted by the Union.

At least now the growing fleet of Raiders is taking a toll – sweeping up 10 VP for the South. 

Batteries are placed in Memphis and Nashville in response to the Union push down the River to Island No. 10.   The new Ironclad appears in Memphis, along with a Gunboat.  Three Blockade Runners and a Raider are built, and 20 VP is spent to place a Battery in Savannah

The Rebel spy A Rose by Any Other Name (Card 82) allows Mark a sneak peak at two cards from the Union hand, and Mark chooses to discard the Engine Breakdown  (Card 47) which can immobilize Rebel Ironclads, as this could seriously hamper his defense of Memphis, which now has two Ironclads and two Gunboats with its Batteries.  

...Be Vewy, Vewy Quiet, Wewe Hunting Webel Waiders...eh eh eh eh eh

The Union, its blockade now solid on the Atlantic Coast and with gunboats filtering around into the Gulf ports as well, decides it has such as surfeit of Screw Sloops that it can afford to go hunting Raiders.    Brandon has been sending out single sloops to search for and sit beside Raiders (this later tactic means the South can not just sit in one spot and raid-raid-raid, as it would be subject to increasingly better searches, but must move and thus give up at least one of those raid attempts).   Now he is send out stacks to hunt them…no luck at first, but the “happy time” for Raiders is drawing to its end.

Rather than take on the massive force at Memphis, Brandon sends his river fleet to Henry & Donelson, where he destroys the battery but TWICE fails the attack rolls, leaving it in Rebel hands.  (See Illustration Below).

 Brandon builds two more Ironclads, a Gunboat and two Screw Sloops.


To be continued…..


Thursday, May 9, 2013

A Game in Progress....

Many thanks to Marco Arnaudo of Bloomington, Indiana for posting these pictures of a game in progress on his Facebook page.  These are from last night; today he is playing the 1862 scenario, which he just remarked: "is a great way to use a day off!"

Here are shots of the Rebels trying to run the Atlantic blockade, where the Union has placed gunboats in the Blockade Stations and screw sloops in the coastal sea zones, and of the situation around Memphis, Island No. 10 and Forts Henry & Donelson.

Note the Union has taken Louisville and Nashville and Chattanooga are as yet without batteries to aid in their defense, as the Confederate has instead concentrated his forces on holding Memphis, the northern key to the Mississippi.

The Union also appears to have made progress, seizing New Berne and driving inland to Goldsboro (although if they have indeed taken it the Confederate Battery marker there should be removed).  With Longstreet deployed to Richmond, however, the Union will need some strong cards to drive north and take the Confederate capital from the southern approach.


Sunday, April 28, 2013

First Time Using the REAL Game...

Today I finally got to "play" Rebel Raiders on the REAL game (instead of my old hand-made playtest copy).

Actually, I did not "play" but taught the game.  My friend Bob, who had been a playtester but had not played for months, was the South, and Charlie, who had never played, was the North -- and I coached him just a little, but only on explaining what he could do, not what he should do.

 Bob as the South frustrated Charlie early on...by turn six he had not lost a single city or port...and had lost only Fredericksburg (which he took back) and had Louisville.  His blockade runners were steaming in and out of ports quite merrily and his raiders were having a romp on the seas.

Charlie got on a slow roll...he kept winning naval battles, sinking ships and blowing up batteries, but LOSING the final attack.  We counted: he made 12 amphibious attacks over the course of the game   and won ONE...Savannah was the ONLY port to fall!

But that was key...as from there he rolled through the South, where there were very few defensive batteries - as Bob concentrated on putting batteries in ports and on using his resources to build ironclads.

Charlie came out of Savannah and took Augusta, then into Atlanta and from there straight across to Vicksburg, then fought DOWN through Baton Rouge to New Orleans!

Jackson died defending Fredericksburg, and Grant took Richmond.

The final battle was a huge naval fight at Memphis (fourth such of the game).   Porter's mortar boats finally had an effect, knocking out a battery before the battle, and the duel of U.S. ironclad Carondelet vs rRebel ram Manassas was epic! Six rounds of combat during which four rebel and three union gunboats were sunk, along with one rebel ironclad forced to retreat due to a mechanical failure card and one Yankee ironclad sunk...then it was Carondelet and another ironclad alone vs Manassas and Charlie won.

That cleared the way for the attack by the army which took Memphis...and that was game (Atlanta,Richmond, the three Mississippi cities, negative rebel points makes for an automatic victory)...and it came on the last attack of the last turn of 1864.  (That is normally the last turn of the game, but Charlie played the card that gave him a chance for a 13th turn and he did win the election that would have given him one more turn)

Charlie sank 33 blockade runners through the course of the game -- there are 17 counters available, which means every blockade runner was basically sunk twice (the South still had four on the board)  and he sank four raiders (but Alabama, ironclad raider Stonewall and two others were still at sea)

It was a great game, both had a lot of fun and both want to play again! (Hopefully next time I will get to play!)